SCP Publisher
This describes the SCP Publisher that publishes certificates and CRLs to a remote location over SCP.
Introduction
For security-aware networks, where you want to minimize traffic to your Certificate Authority (CA), EJBCA supports using specific instances as CAs and others as Validation Authorities (VAs). A VA is typically deployed in a different network zone than a CA, where the latter has more protection. Data synchronization between the CAs and the VAs is necessary to ensure that the VAs are distributing information about certificate status, OCSP, Certificate Revocation Lists (CRLs), and so on.
By configuring EJBCA's SCP Publisher, certificate status and CRLs can be published to a remote host using SCP, thereby avoiding sending incoming traffic to the CA. By combining the SCP Publisher on the CA with the EJBCA Certificate and CRL Reader Service on the VA, you can securely update the certificate and CRL data in your VA regularly.
SCP publishing will not be instantaneous. Although the CRL or certificate is written to the remote host directly after issuance, there will be a delay before the changes are picked up by the VA. The delay incurred depends on the periodic interval configured for the Certificate and CRL Reader Service. Another aspect to take into consideration is that the CA cannot automatically query the VA in case of a broken connection.
With EJBCA Enterprise Edition, you can integrate your CA with your VAs and RAs using the peer publisher, see Validation Authority Peer Publisher.
Publisher Details
Certificates and CRLs copied to the remote host are named after their SHA1 fingerprint. Only certificates with the following statuses are published:
CertificateConstants.CERT_REVOKED
CertificateConstants.CERT_ACTIVE
The data written to the remote host is either a DER-encoded CRL or a serialized org.ejbca.scp.publisher.ScpContainer object, in order to retain revocation details and other pertinent information. If a signing CA is used, the data is wrapped in a CMS envelope. The data can later be retrieved by a using the Certificate and CRL Reader Service.
Configure SCP Publisher
To configure an SCP Publisher publisher, do the following:
Go to CA Functions > Publishers .
S elect the SCP Publisher from the List of Publishers and click Edit Publisher .
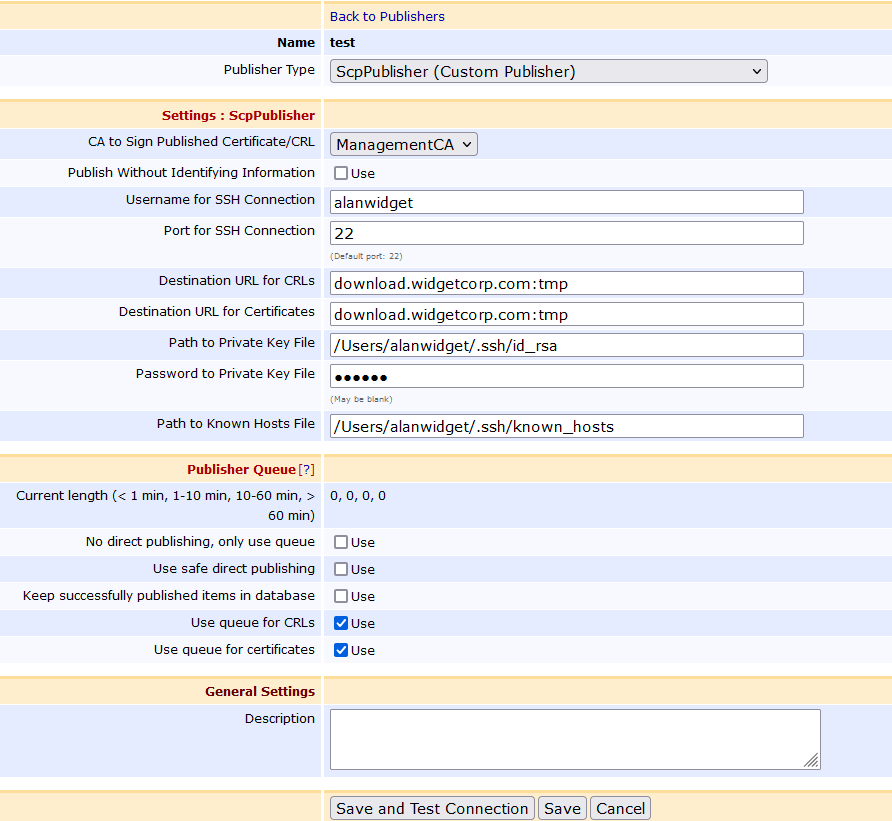
On the Edit Publisher page, select the Publi sher Ty pe ScpPublisher (Custom Publisher).
Specify the publi sher settings (described in SCP Publisher Settings below).
Complete the remaining publisher settings (described in Publishers Overview ).
Click Save and Test Connection to store the information and validate the configuration.

Once the publisher is created, it needs to be selected in the Certificate Profile Publishers list to be active. For more information, see Publishers Management.
Save and Test Connection
To verify the configuration, click Save and Test Connection to attempt to establish a connection to the destination server. Note that this will not write any data to the server and will hence not verify any server-side access rights.
SCP Publisher Settings
Configuring the SCP Publisher is as easy as using the scp command. The following parameters are available.
|
Parameter |
Description |
|
CA to Sign Published Certificate |
If the published certificate/CRL should be individually signed by CA before being copied to the destination. |
|
Publish Without Identifying Information |
If identifying information (such as the contents of the Subject DN, SAN, etc) should be redacted, in compliance with GDPR and other privacy regulations. |
|
Username for SSH Connection |
The username used to establish the SSH connection. |
|
Port for SSH Connection |
The port for establishing the SSH connection. By default, port 22 is used. |
|
Destination URL for Certificates/CRLs |
URL for the end destination of the certificate/CRL files, including directory, in the format: domain.name:/path/to/folder/ If a fixed CRL file name is added to the destination location, it will publish a single file of the CA with the specified name. Existing CRLs will be overwritten. Example: download.widgetcorp.com:tmp/SubCA.crl. Note that this is not suitable if both regular and DetlaCRL are used at the same time, and it also requires a dedicated Publisher for each CA. |
|
Path to Private Key File |
Path to a local private key used to establish the connection. A corresponding public key should exist in the same directory with the same name and the .pub suffix. The private key file must be in PKCS#8 PEM or OpenSSH PEM format. If you generate the key using the ssh-keygen command, you must use the "-f PEM" option to generate the private key in OpenSSH PEM format (otherwise it will use RFC4716 format which is currently not supported). |
|
Password to Private Key File |
Password to the private key. The field may be left blank if the private key is not password protected. The password is encrypted in the database using the passphrase defined by password.encryption.key in cesecore.properties in order to prohibit it from being read in cleartext from a database dump. |
|
Path to Known Hosts File |
Path to the file of known hosts. EJBCA enforces host key checking for security. The known hosts file must contain the fingerprint of the server's public RSA key. Be wary of copying an existing known hosts file since they typically only contain an EdDSA or ECDSA key fingerprint. To create a working known hosts file, use the following command: ssh-keyscan -H -t rsa,ecdsa my.server >> known_hosts |
Make sure to change the password.encryption.key in cesecore.properties from the default value.
For more information on different publishers and their purposes, see Publishers Overview.